This tutorial assumes you already have FlashFXP and have it running on your computer, but not connected to another server.
Now let’s learn how to upload or transfer files from our computer to a remote server.
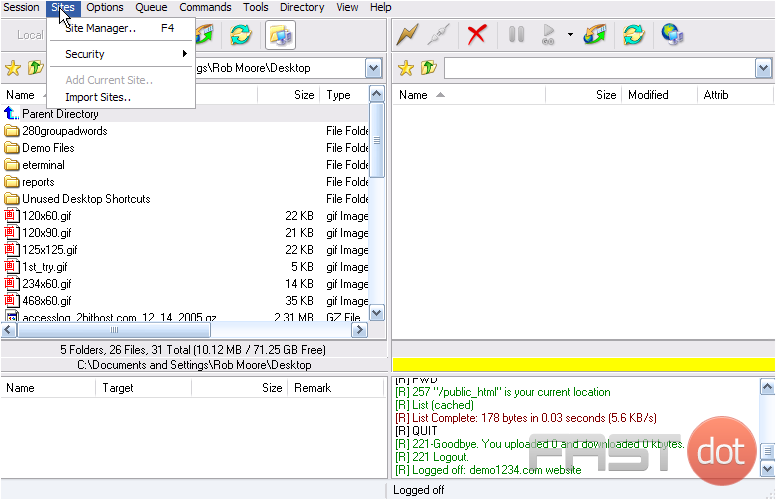
1) Click the Sites menu.
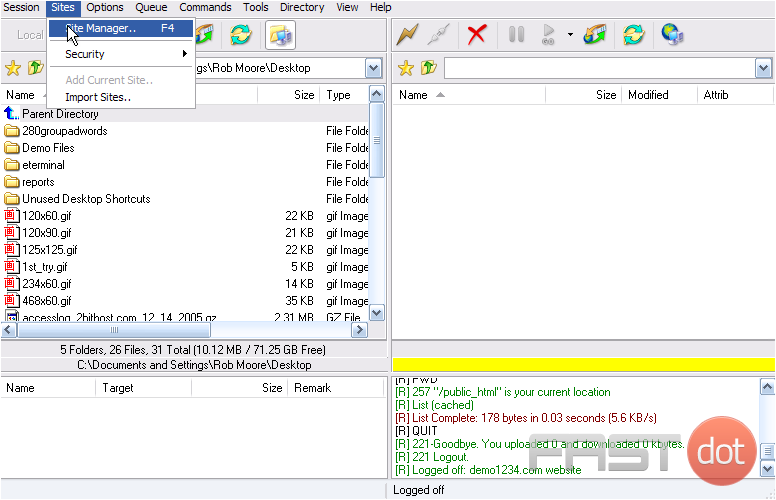
2) Then select Site Manager.
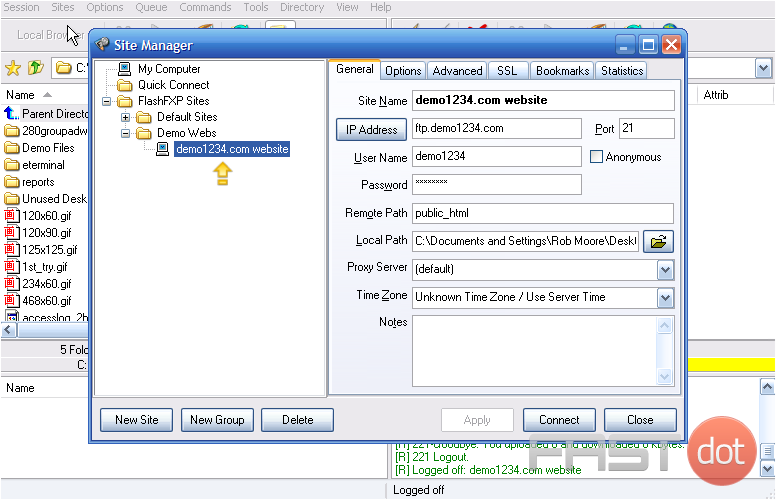
3) Before connecting to a remote server, we want to double check it’s settings. This is the site we want to connect to. Once we’re sure all the settings on the right are correct (ftp.demo1234.com, username and password), click the Close button.
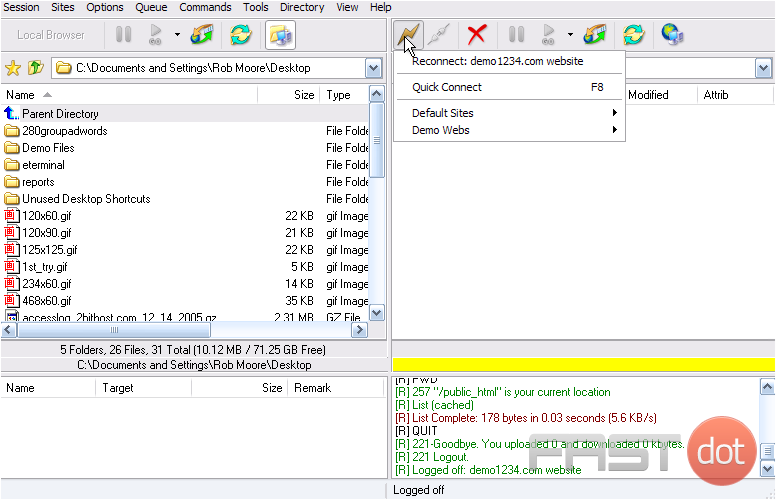
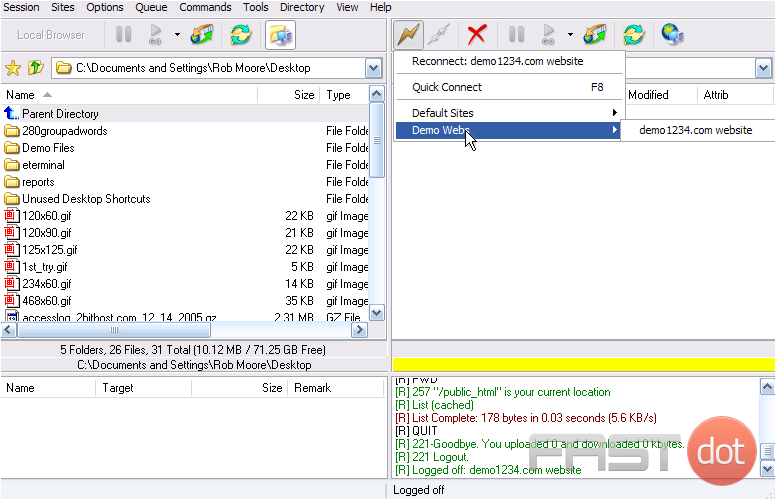
4) To establish a connection to a remote server, click this “lightning bolt” icon.
5) Locate the site we want to connect to…. click Demo Webs. Then select demo1234.com website.
FlashFXP is a powerful FTP, FTPS, and SFTP client for Windows that provides an easy way to upload files to a server. Its intuitive interface and range of features make it a popular choice for website developers, administrators, and anyone who needs to manage files on remote servers. Here’s a step-by-step guide to uploading files using FlashFXP:
Step 1: Connect to Your Server
- Open FlashFXP. Launch FlashFXP on your computer.
- Create a New Site Connection. If this is your first time connecting to your server, you’ll need to create a new site in the Site Manager.
- Go to Sites > Site Manager from the menu or press
F4. - Click on the New Site button.
- Enter the Name for the connection (this is just for your reference) and fill out the details for your server, including the FTP server address, Username, and Password. Choose the Server Type (FTP, FTPS, SFTP) depending on your server’s configuration.
- Click Save to store your site configuration.
- Go to Sites > Site Manager from the menu or press
- Connect to the Server. Highlight the site you just created in the Site Manager and click Connect. Alternatively, if you’ve connected to this server before, you can select it from the quick connect dropdown at the top of the FlashFXP window.
- Once connected, you’ll see two panes: the left pane shows the local files on your computer, and the right pane displays the files on the remote server.
- Navigate to the Local Directory where the files you want to upload are stored by double-clicking folders in the left pane.
- Navigate to the Remote Directory where you want to upload the files by double-clicking folders in the right pane.
Step 3: Upload Files
- Select Files/Folders. In the left pane (local system), browse to the folder containing the files you want to upload. Click to select the files or folders you wish to upload. You can select multiple items by holding down the
Ctrlkey while clicking. - Upload. Once you’ve selected the files/folders, you have several options to start the upload:
- Drag and Drop. Click and drag the selected files/folders from the left pane to the desired location in the right pane.
- Use the Toolbar Button. Click the blue arrow pointing to the right (between the panes) to upload the selected files/folders.
- Right-Click Menu. Right-click the selected files/folders, and choose Upload from the context menu.
- FlashFXP will begin transferring the files to the server. The progress of the upload can be monitored in the queue window at the bottom of the FlashFXP interface.
Step 4: Monitor the Upload Progress
- The status bar at the bottom of the FlashFXP window shows the progress of the current transfer, including speed and estimated time remaining. Once the upload is complete, the files/folders will appear in the remote directory pane.
Step 5: Verify the Upload
- After the upload completes, you can verify that all files/folders have been correctly uploaded by comparing the contents of the local and remote directories.
Additional Tips
- Queue Management. FlashFXP allows you to manage the transfer queue, meaning you can pause, resume, or cancel transfers as needed.
- Transfer Settings. For advanced users, FlashFXP offers various settings to optimize transfer speeds and manage file conflicts. These can be accessed via the Options menu.
- Scheduled Transfers. FlashFXP supports scheduling transfers, enabling you to automate uploads or downloads at specified times.
By following these steps, you can efficiently upload files to your server using FlashFXP, taking advantage of its robust features for managing your website or server files more effectively.

