Managing files and folders in FTP Voyager
This tutorial assumes you already have FTP Voyager running on your computer, and connected to a remote server.
Now let’s learn how to manage our website files.
The first thing we’re going to do is create a new folder (or directory) on the remote server.
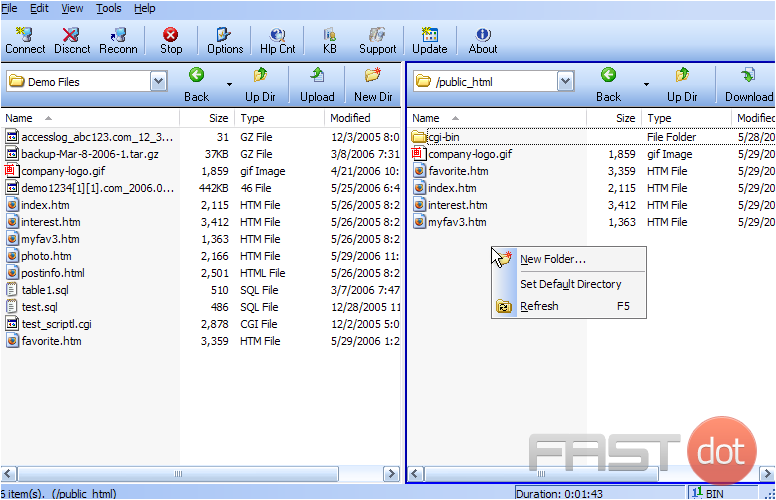
1) Right-click anywhere here in the remote server window.
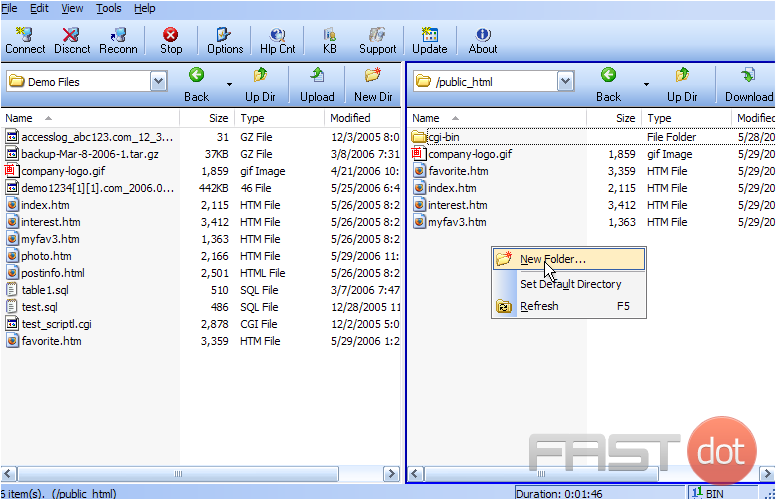
2) Then click New Folder.
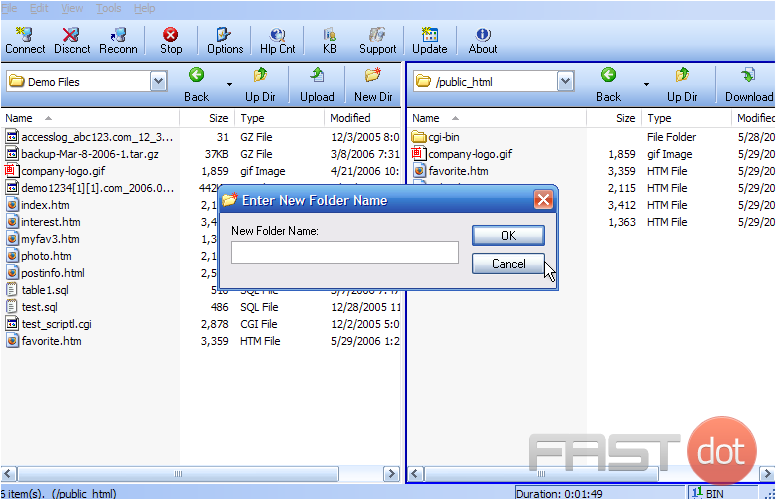
3) Type a name for the new folder here, then click OK.
That’s all there is to it. Now let’s rename this new folder…..
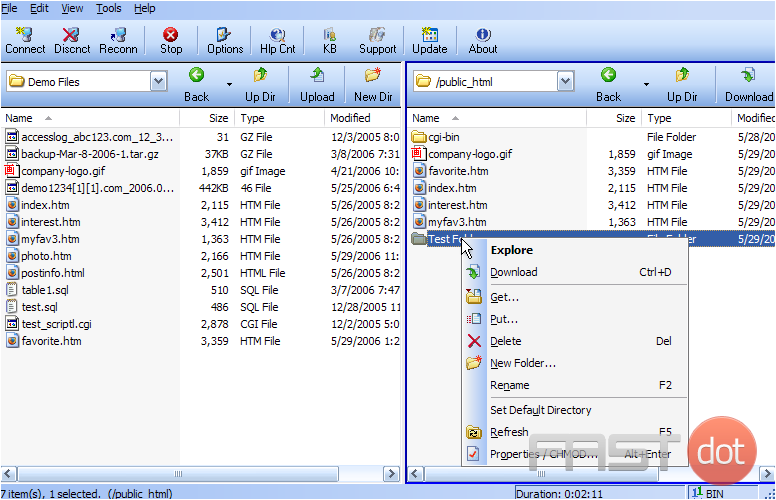
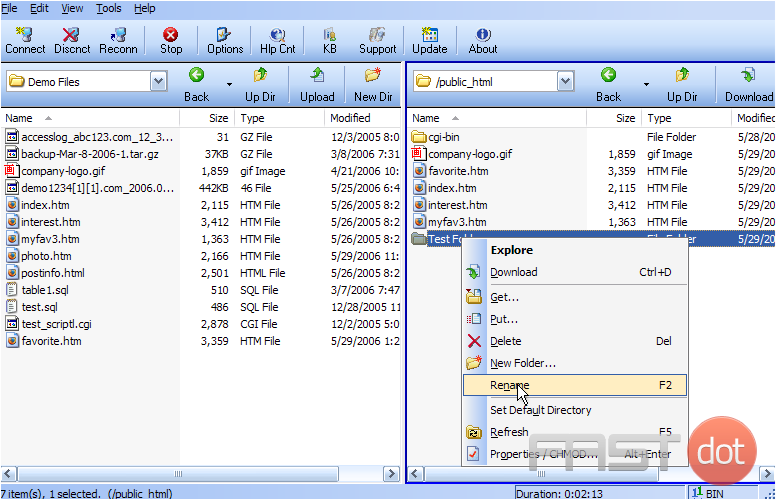
4) Right click the folder…..
5) Then click Rename.
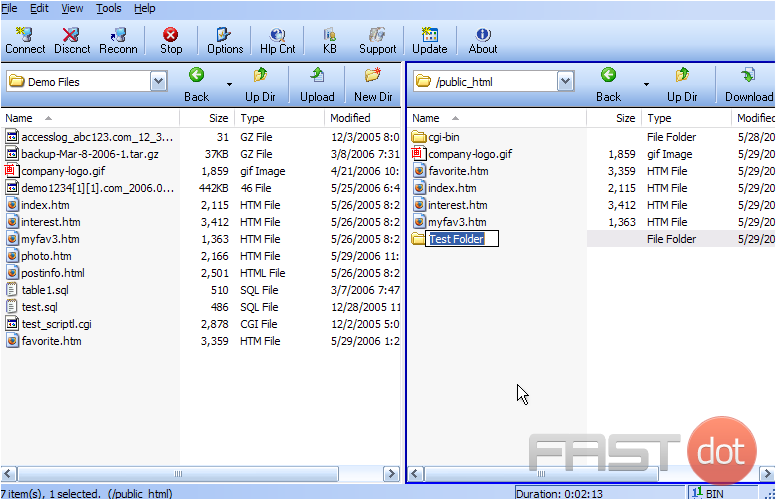
6) Type the new folder name in here.
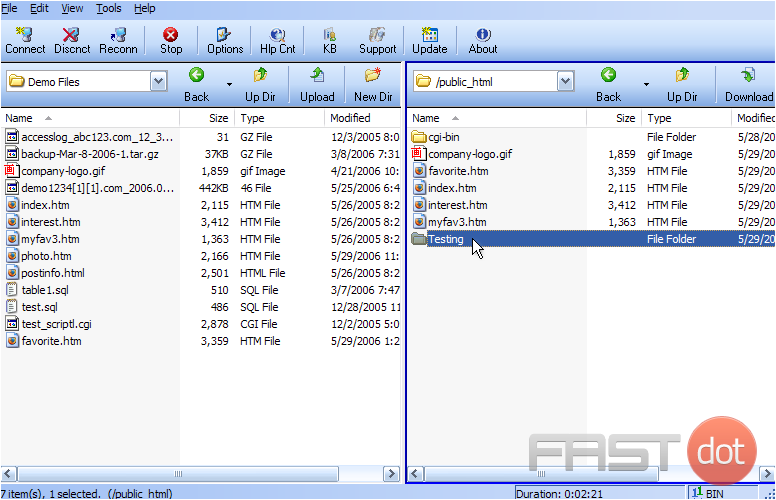
The new folder has been renamed.
You can also rename files the same way as you rename folders.
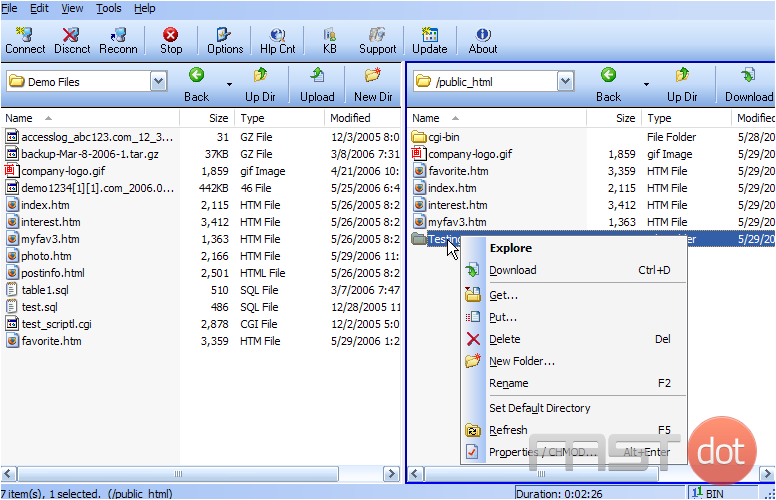
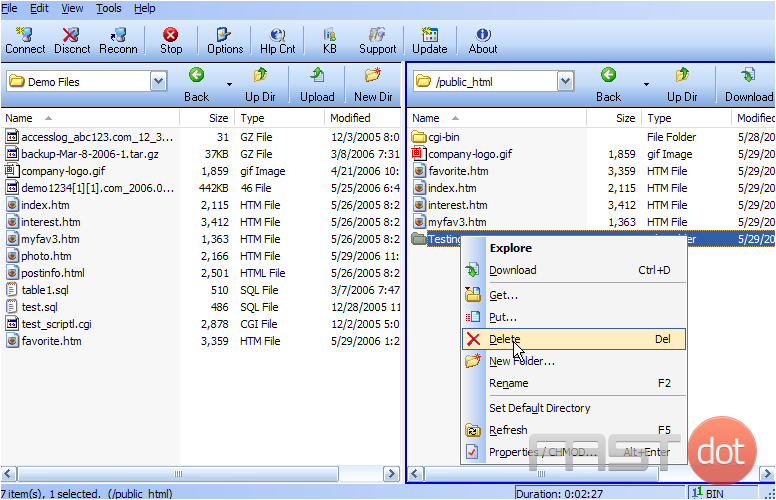
7) To delete a folder (or file), simply right-click it…..
8) ….. then click delete.
The folder we just created, has been deleted.
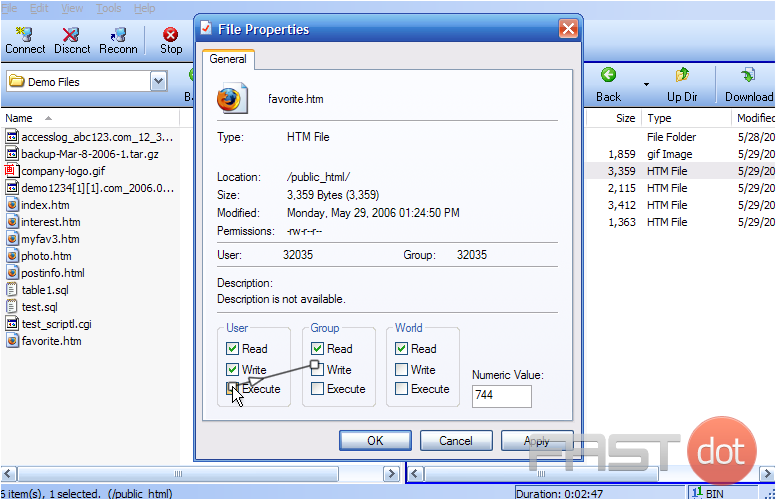
Now let’s learn how to change the permissions of a file.
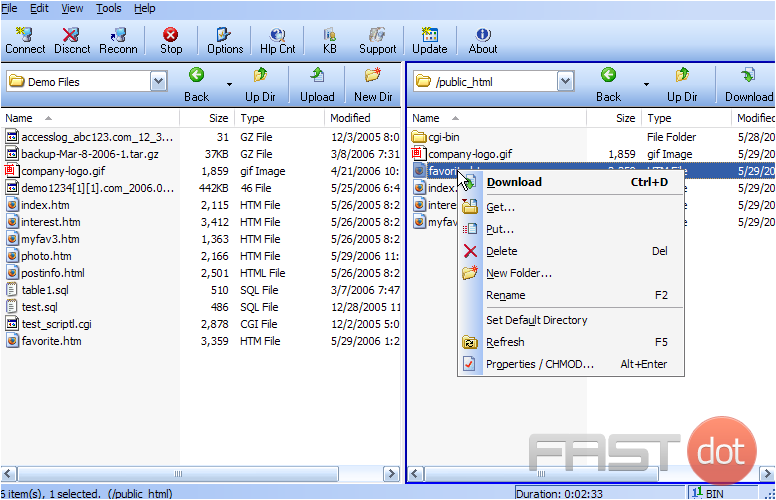
9) Right-click the file for which you want to change permissions.
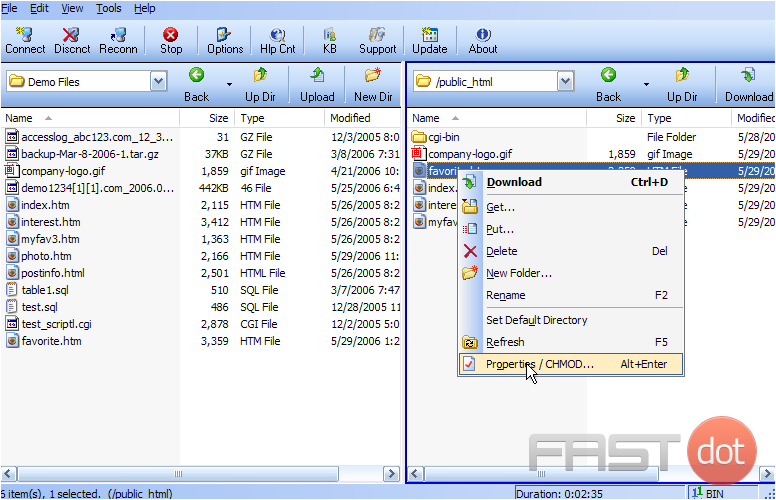
10) Then click Properties /CHMOD.
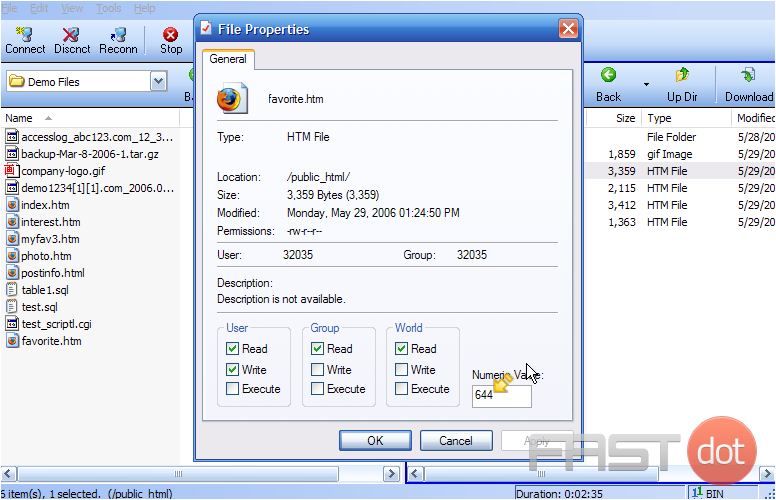
11) To change the file permissions, simply enter the new permissions value here…..
12) ….. or check off the appropriate permission boxes below.
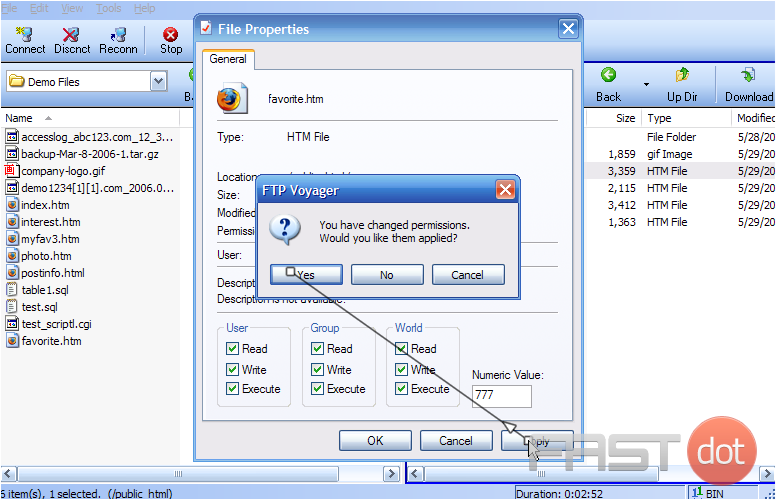
13) Click Apply, then OK when finished.
FTP Voyager is a powerful FTP client for Windows that allows users to transfer files between their local system and a server on the Internet. With a user-friendly interface reminiscent of Windows Explorer, FTP Voyager makes it easy to manage files and folders, whether you’re uploading a website or backing up data. Here’s a comprehensive guide on how to manage files and folders in FTP Voyager:
Connecting to an FTP Server
- Launch FTP Voyager: Start FTP Voyager from your desktop or start menu.
- Create a New Site Profile:
- Click on the “File” menu, then select “New” and choose “Site Profile”. This opens the Site Profile Manager.
- Enter the details of the FTP server you wish to connect to, including a profile name, host address, username, and password. You can also specify the connection type (FTP, FTPS, SFTP) depending on your server’s configuration and security requirements.
- Connect to the Server:
- Highlight the site profile you’ve just created and click “Connect”. If the details are correct, you’ll be connected to your FTP server and can start managing files and folders.
Managing Files and Folders
- Navigating Directories: The interface is split into two panes – the left pane shows your local files, and the right pane shows the files on the FTP server. You can navigate through directories by double-clicking them, just like you would in Windows Explorer.
- Transferring Files: To transfer a file or folder, simply drag and drop it from one pane to the other. You can also use the transfer buttons located between the panes for the same purpose.
- Upload: Select files or folders from the left pane (local system) and drag them to the right pane (FTP server) or use the upload button.
- Download: Select files or folders in the right pane (FTP server) and drag them to the left pane (local system) or use the download button.
- Creating New Folders: To create a new folder on the FTP server, navigate to the location where you want the new folder, right-click, select “New Folder”, and name the folder.
- Renaming Files/Folders: Right-click on the file or folder you wish to rename, select “Rename”, and enter the new name.
- Deleting Files/Folders: To delete, select the files or folders and press the delete key or right-click and select “Delete”.
Additional Features
- Scheduling Transfers: FTP Voyager allows you to schedule file transfers, making it easy to automate backups or updates. Access this feature via the Scheduler, where you can create, manage, and monitor scheduled tasks.
- Sync Folders: Use the Sync feature to ensure that folders in your local system and FTP server mirror each other, which is useful for keeping backups current or for website management.
- File Filters: File filters can be applied to display only files that match certain criteria, making it easier to work with large directories.
- Queuing Transfers: Large transfers can be queued up, allowing FTP Voyager to process them sequentially. This is particularly useful for managing bandwidth and ensuring that critical transfers are completed efficiently.
Best Practices
- Secure Connections: Always use FTPS or SFTP if your server supports it to secure your data during transfer.
- Backup: Regularly backup important data from your FTP server to your local system, especially before making significant changes.
- Keep Updated: Ensure your version of FTP Voyager is up to date to benefit from the latest features and security improvements.
FTP Voyager combines advanced features with an intuitive interface, making it an excellent choice for both novice users and experienced administrators. By following the steps outlined above, you can efficiently manage your files and folders, making the most of your FTP Voyager experience.

