In WHM (Web Host Manager), performing actions on multiple accounts at once is useful for managing large numbers of hosting accounts efficiently. WHM provides several features that allow you to manage, modify, or perform bulk actions on multiple cPanel accounts simultaneously.
Common Bulk Actions in WHM
- 1 Common Bulk Actions in WHM
- 2 Step 1: Access WHM and Navigate to Account Functions
- 3 Step 2: Bulk Terminate Accounts
- 4 Step 3: Modify Quotas for Multiple Accounts
- 5 Step 4: Bulk Modify Packages
- 6 Step 5: Suspend or Unsuspend Multiple Accounts
- 7 Step 6: Email All Account Owners
- 8 Step 7: Modify DNS for Multiple Accounts
- 9 Step 8: Modify Account Passwords in Bulk
- 10 Step 9: Transfer Multiple Accounts Between Servers
- 11 Step 10: Custom Scripts for Bulk Actions
- 12 Conclusion
- 13 For your convenience, WHM provides you with the time-saving ability to perform some actions on multiple accounts at once.
- Terminate Multiple Accounts
- Modify Quotas or Packages for Multiple Accounts
- Suspend or Unsuspend Multiple Accounts
- Email All Account Owners
- Modify DNS for Multiple Accounts
- Modify Account Passwords
- Transfer Multiple Accounts Between Servers
- Log in to your WHM interface using your administrator credentials.
- From the WHM dashboard, go to Account Functions. This section contains most of the options to manage multiple accounts at once.
Step 2: Bulk Terminate Accounts
Terminating accounts means permanently deleting them, including files, databases, and settings.
- In the Account Functions section, click Terminate Accounts.
- You’ll see a list of all the accounts on the server.
- Select the accounts you want to terminate by ticking the checkboxes next to their domain names.
- Click Remove Selected Accounts.
- A confirmation message will appear, and you can proceed by clicking Yes, Remove.
Important: This action cannot be undone, so ensure you select the right accounts.
Step 3: Modify Quotas for Multiple Accounts
To modify disk space quotas for multiple accounts, follow these steps:
- Go to Account Functions > Quota Modification.
- Select the accounts whose quotas you want to modify.
- For each account, enter the new disk space limit.
- Once all quotas are set, click Save to apply the changes.
Step 4: Bulk Modify Packages
To apply or change hosting packages across multiple accounts:
- Navigate to Account Functions > Upgrade/Downgrade Multiple Accounts.
- From the list of accounts, select the ones you want to modify.
- Choose the hosting package you want to assign to these accounts from the dropdown menu.
- Click Change to update all selected accounts to the new package.
Step 5: Suspend or Unsuspend Multiple Accounts
Suspending accounts can be useful if clients fail to pay, violate terms, or temporarily need to pause hosting services.
- Go to Account Functions > Suspend/Unsuspend Multiple Accounts.
- You’ll see two tabs: Suspend and Unsuspend.
- Suspend: Select the accounts you want to suspend.
- Unsuspend: Select the accounts you want to unsuspend (if already suspended).
- After making the selections, click Proceed to apply the changes.
Step 6: Email All Account Owners
If you need to send a message to all your hosting account owners, follow these steps:
- In the WHM sidebar, navigate to Account Functions > Email All Users.
- You’ll be prompted to create a subject and message body.
- Choose whether you want to send the email to all accounts or a specific group of accounts.
- Click Send to dispatch the email.
Step 7: Modify DNS for Multiple Accounts
WHM allows you to modify DNS zones for multiple accounts at once if you need to update DNS settings across several accounts.
- Go to DNS Functions > Edit DNS Zone.
- You’ll see a list of all domains. Select the ones you wish to modify.
- Modify the DNS settings as needed.
- Click Save to apply the changes.
Step 8: Modify Account Passwords in Bulk
- Navigate to Account Functions > Password Modification.
- Select the accounts for which you want to reset passwords.
- Enter new passwords or click the Generate button to auto-generate secure passwords.
- Once you’ve set passwords for all selected accounts, click Change Passwords.
Step 9: Transfer Multiple Accounts Between Servers
If you’re migrating accounts between servers:
- In WHM, go to Transfers > Transfer Tool.
- Select the accounts you want to transfer by providing the source server’s credentials.
- Choose which accounts to transfer and the associated data (e.g., home directory, databases).
- Initiate the transfer. WHM will handle copying all files, databases, and configurations.
Step 10: Custom Scripts for Bulk Actions
If WHM’s built-in features are not enough for specific tasks, you can also run custom scripts to perform bulk actions on multiple accounts. WHM allows system administrators to write and execute bash scripts or PHP scripts using the WHM API. You can use this approach for more advanced tasks such as creating backups for multiple accounts, updating configurations, or automating routine actions.
Conclusion
Managing multiple accounts in WHM is made easy with its built-in bulk action tools. Whether you need to terminate accounts, modify hosting packages, suspend accounts, or perform transfers, WHM provides an intuitive and efficient interface for performing these tasks in bulk. If further customisation is needed, using WHM’s API or scripting solutions can help automate more complex tasks.
By following the steps above, you can optimise your hosting operations and save time when performing actions across numerous accounts.
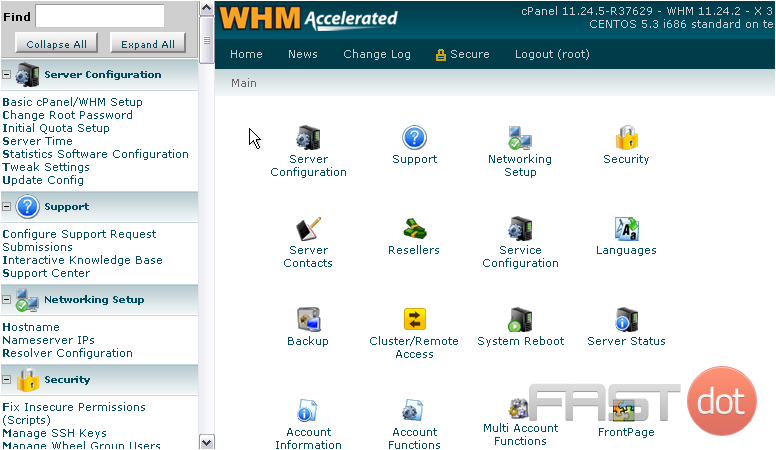
For your convenience, WHM provides you with the time-saving ability to perform some actions on multiple accounts at once.
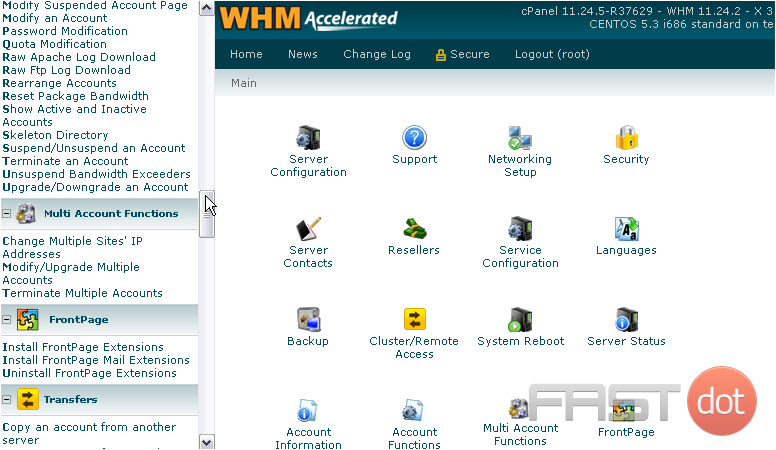
1) You can find these tools under Multi Account Functions.
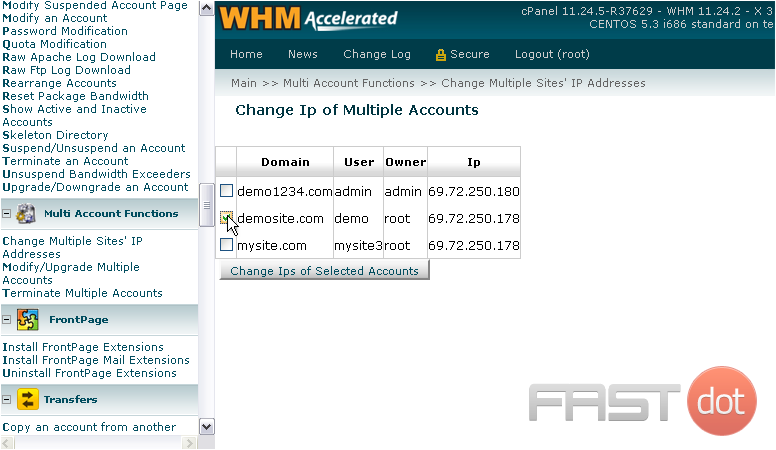
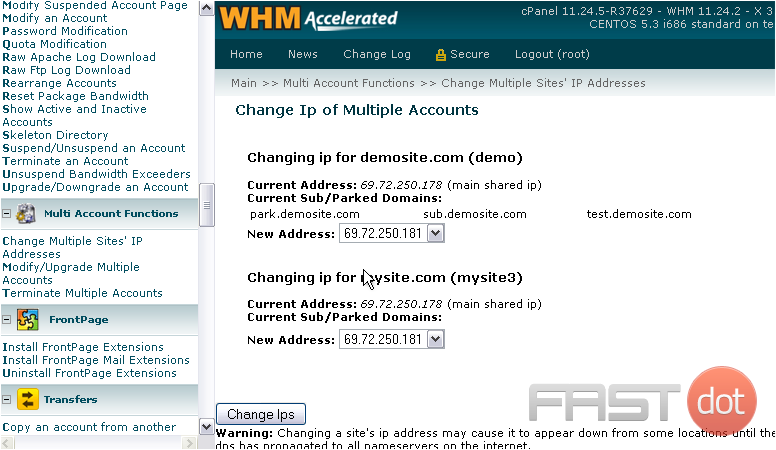
2) First, let’s see how to Change Multiple Sites’ IP Addresses.
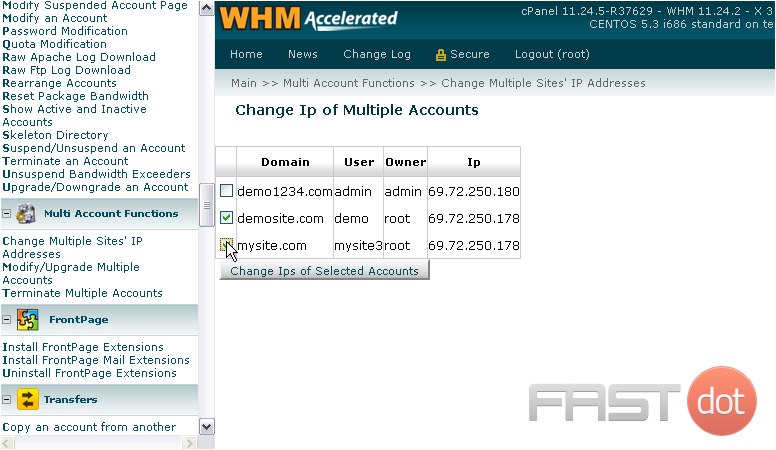
3) Select all accounts whose IPs you wish to change.
4) Then, click Change IPs of Selected Accounts.
If you’ve changed a single site’s IP address, this should look familiar. The procedure is exactly the same.
5) Simply use the drop-down menu under each account to select a new IP address.
6) Then, click Change IPs.
Watch the tutorial earlier in this series if you want more details.
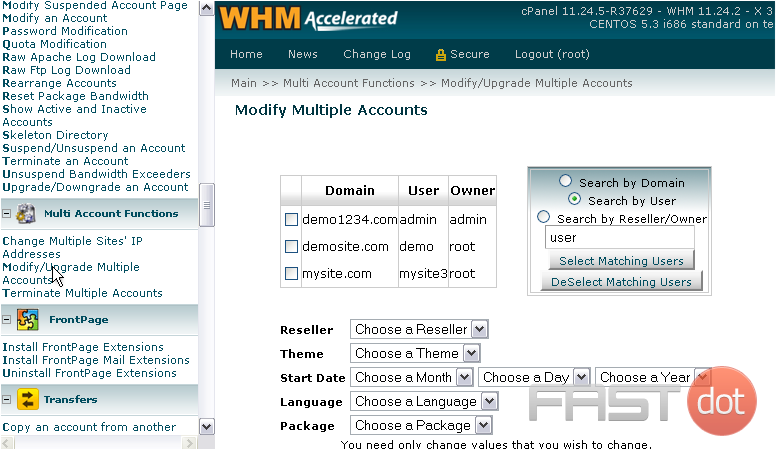
7) Now, let’s check out the next function in the menu.
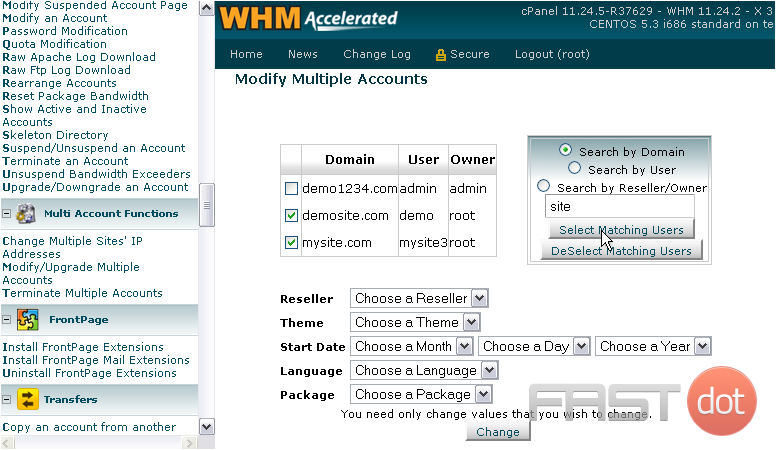
This feature lets you modify aspects of multiple accounts at the same time.
8) Select each account using its respective checkbox.
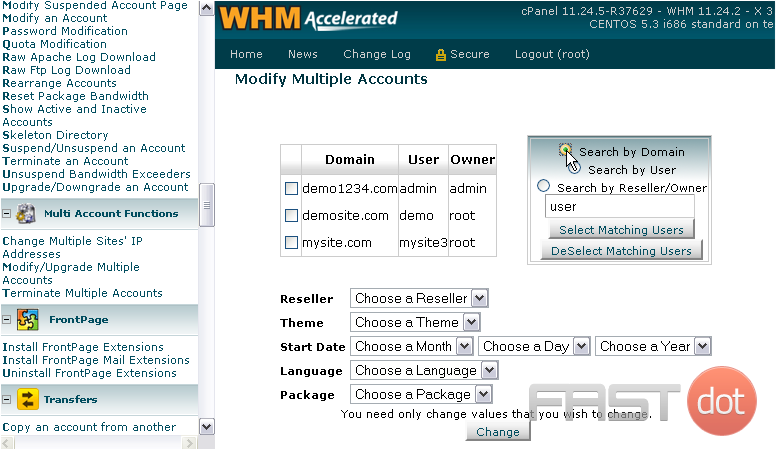
9) Or, use the search box at right to automatically select or deselect all accounts matching your specifications.
10) Select by which setting you wish to search.
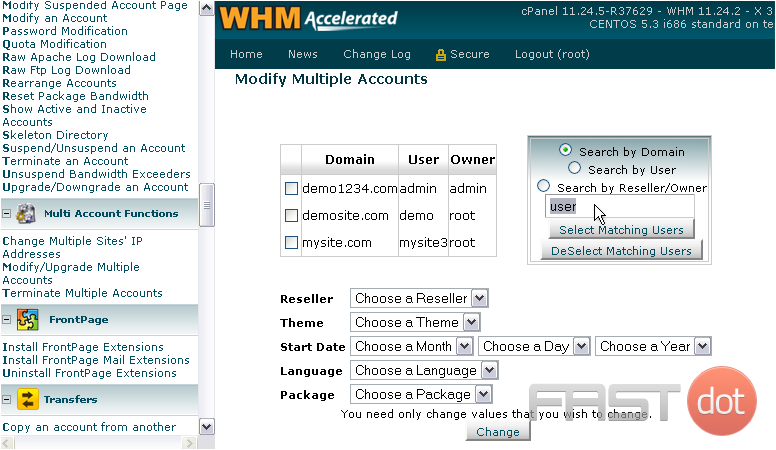
11) Then, fill in a search term.
12) Hit either Select or DeSelect Matching Users.
The two matching users have been selected for us automatically.
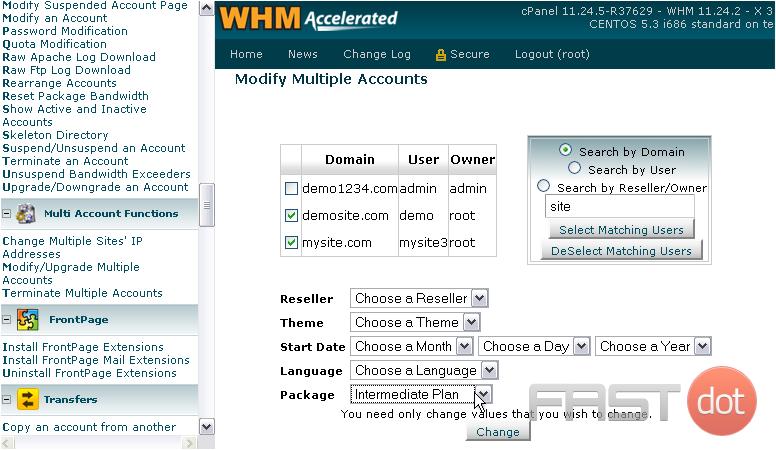
13) Now, for the settings. Choose only those values that you wish to change for these accounts. All accounts’ settings will be changed to the values you specify below.
14) Let’s set these two accounts to use a new package. Select one from the list.
When changing packages on accounts, you should note that all accounts will be reset to the base settings of the package — even if an account already uses that particular package.
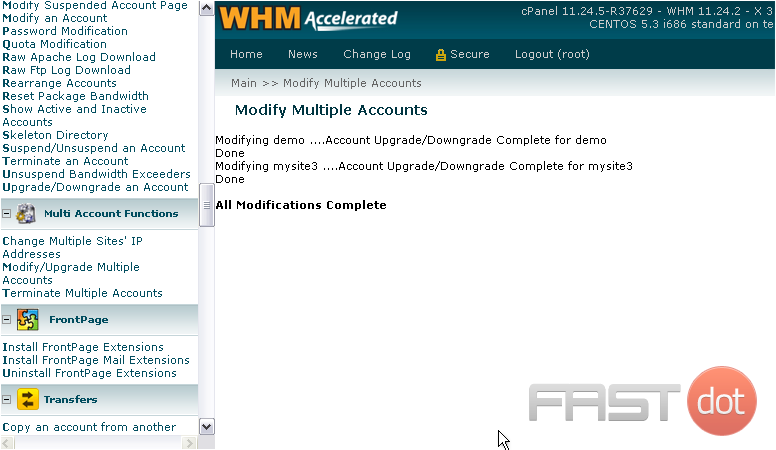
15) Click the Change button to apply all changed settings to the selected accounts.
All modifications to both accounts are now complete.
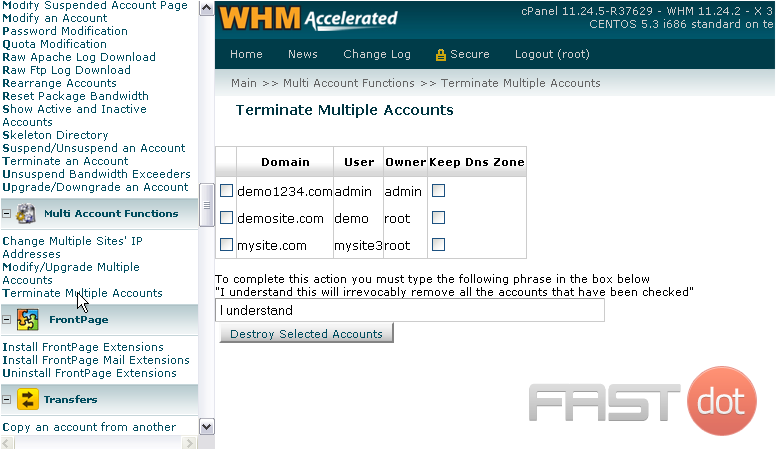
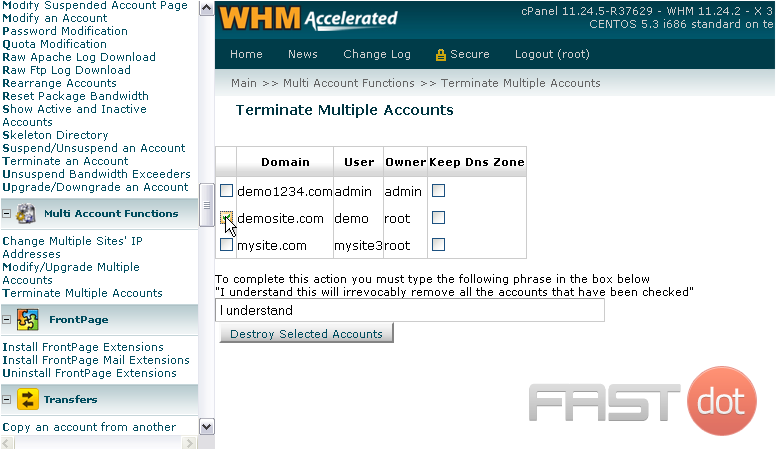
16) Now, let’s go to the last page: Terminate Multiple Accounts.
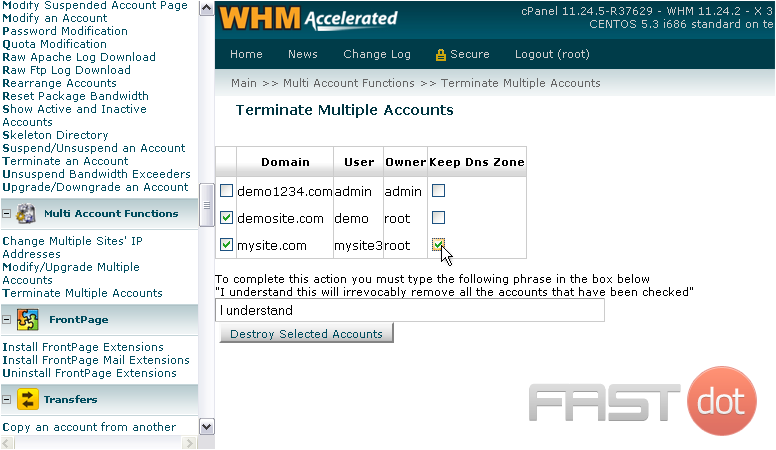
17) Check the box next to all the accounts in the list you want to terminate.
18) Optionally, use these checkboxes to keep the DNS Zones for the terminated accounts.
19) Next, you must type the phrase as described in the instructions. This is to confirm that you realize all the selected accounts will be permanently and irrevocably deleted from your server.
20) Finish by clicking this button.
This completes the tutorial. You now know how to use the three Multi-Account Functions in WHM.
Do you have any questions? Ask us in the forums →

