PuTTY is a free and open-source terminal emulator, serial console, and network file transfer application that supports various network protocols, including SSH. It is widely used to connect to remote servers securely. One of its useful features is the ability to save server connection settings, making it easier to reconnect to frequently used servers without re-entering the details each time.
This guide will walk you through the steps to save server connection settings in PuTTY.
Prerequisites
- PuTTY Installed: Ensure that PuTTY is installed on your Windows machine. You can download it from the official website.
- Server Details: Have the server hostname or IP address, the port number, and the username ready.
Steps to Save Server Connection Settings in PuTTY
- Open PuTTY:Launch the PuTTY application by double-clicking on the PuTTY executable file (
putty.exe). - Enter Basic Connection Details:In the PuTTY Configuration window, under the “Session” category, enter the following details:
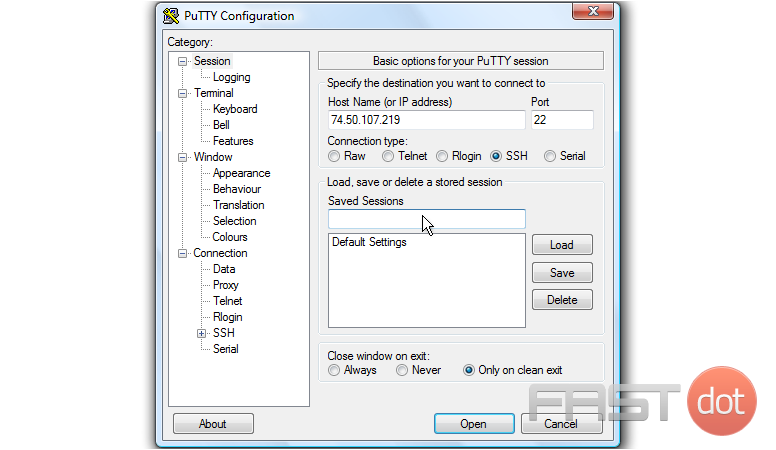
- Host Name (or IP address): Enter the hostname or IP address of the remote server.
- Port: Enter the port number (default is 22 for SSH).
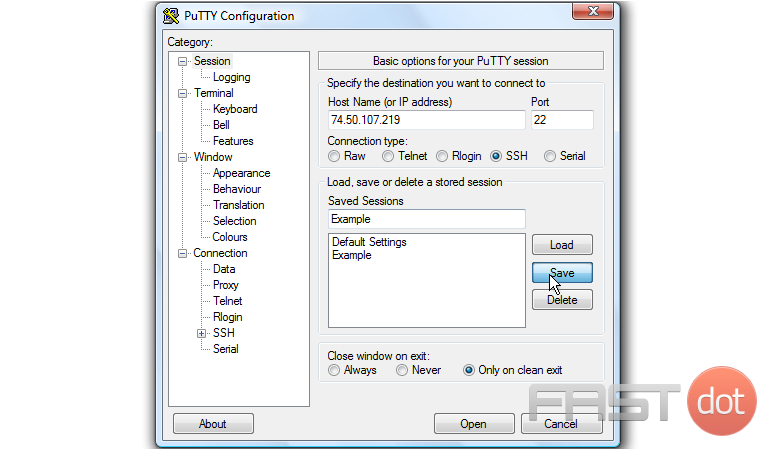
- Save the Session:In the “Saved Sessions” text box, type a name for this session (e.g.,
MyServer).Click the Save button to save the session settings. The session name will appear in the list of saved sessions. - Configure Additional Settings (Optional):If you want to configure additional settings (like SSH keys, terminal appearance, etc.), navigate to the appropriate category in the left-hand menu.After configuring the additional settings, return to the “Session” category.
Select the session name you just created, and click Save again to update the session with the additional settings.
Example: Saving a Session with SSH Key Authentication
- Enter Basic Connection Details:Host Name (or IP address):
192.168.1.10Port:22 - Save the Basic Session:In the “Saved Sessions” text box, type
MyServerand click Save. - Configure SSH Key Authentication:In the left-hand menu, navigate to Connection > SSH > Auth.Under “Authentication parameters”, click Browse and select your private key file (e.g.,
id_rsa.ppk). - Save the Updated Session:Return to the “Session” category.Select
MyServerfrom the list of saved sessions.Click Save to update the session with the SSH key authentication settings.
Connecting to a Saved Session
- Open PuTTY:Launch PuTTY by double-clicking the PuTTY executable file.
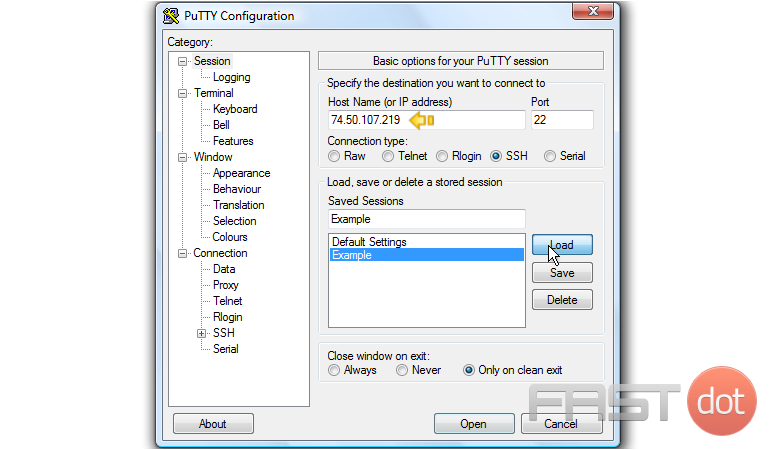
- Load the Saved Session:In the PuTTY Configuration window, under the “Session” category, select the saved session name (e.g.,
MyServer) from the list.Click Load to load the session settings. - Connect to the Server:Click Open to initiate the SSH connection using the saved settings.
Editing or Deleting a Saved Session
- Editing a Session:Load the session by selecting it and clicking Load.Make the desired changes to the settings.
Return to the “Session” category, select the session name, and click Save to update the session.
- Deleting a Session:Select the session name from the list.Click Delete to remove the saved session from the list.
Conclusion
Saving server connection settings in PuTTY can significantly streamline your workflow by allowing quick and easy access to frequently used servers. By following the steps outlined in this guide, you can efficiently manage your server connections and focus more on your tasks without the hassle of re-entering connection details every time.
PuTTY’s flexibility and comprehensive configuration options make it a powerful tool for network administrators and developers alike. By utilising saved sessions, you can enhance your productivity and ensure secure, consistent access to your remote servers.
This tutorial will show you how to save server connection settings in Putty
Now let’s learn how to load, save or delete server connection settings
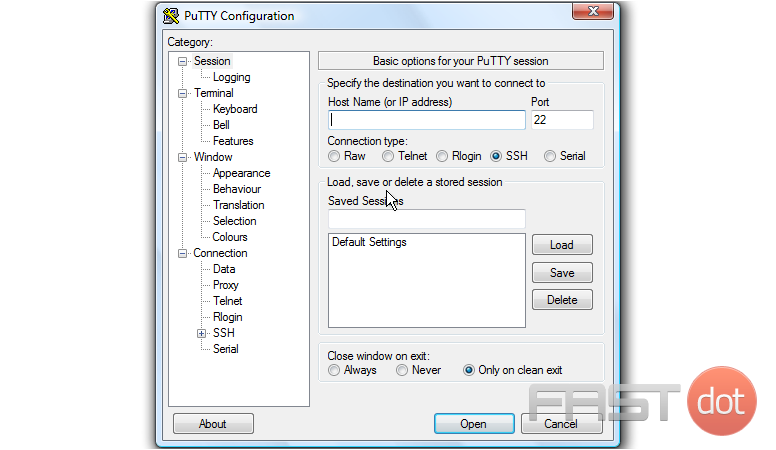
1) Double click the PuTTY icon to launch the application

2) First let’s learn how to save connection settings
3) Type the server IP address here
4) Type a saved session name here
5) Then click Save to save the settings
We can then proceed to connect to our server
6) Now let’s say we want to load a saved connection setting… let’s open PuTTY again

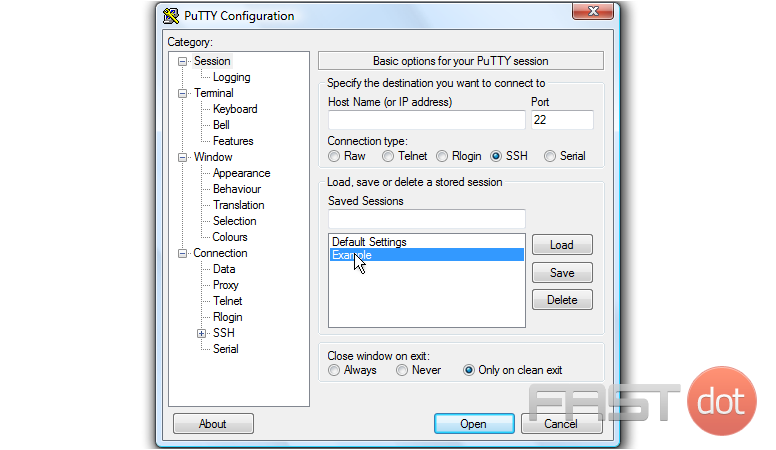
7) Choose the saved connection setting you want…

8) … then click Load. You will notice your server connection settings are now shown here
We can then proceed to connect to our server
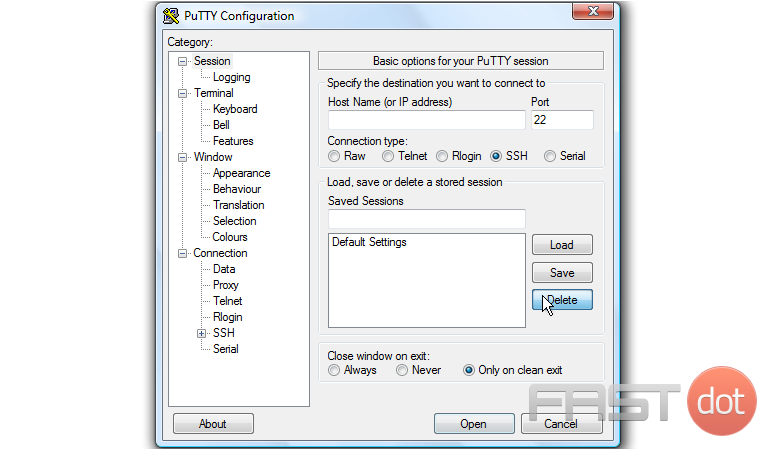
9) To delete a saved session, first select the session name you want to delete here
10) Then click Delete
11) To exit PuTTY, simply close the window
That’s it! The saved session has been removed from the list
This is the end of the tutorial. You now know how to load, save and delete server connection settings