- 1
- 2 Why Is Envira Gallery the Best Choice for Creating Beautiful Galleries in WordPress?
- 3 Key Takeaways:
- 4 What Is Envira Gallery?
- 5 Why Is Envira Gallery the Best Choice for Creating Beautiful Galleries in WordPress?
- 6 How Can You Create a Gallery with Envira Gallery?
- 7 What Are the Different Types of Galleries You Can Create with Envira Gallery?
Why Is Envira Gallery the Best Choice for Creating Beautiful Galleries in WordPress?
Envira Gallery is a popular WordPress plugin that allows users to easily create and customize beautiful and responsive photo and video galleries on their websites. It is a top choice for photographers, bloggers, and businesses who want to showcase their visual content in an attractive and professional manner.
So why is Envira Gallery the best choice for creating galleries in WordPress? Let’s explore its features and benefits.
- User-Friendly Interface: Envira Gallery has a user-friendly and intuitive interface, making it easy for even beginners to create and manage galleries on their website.
- Extensive Gallery Customization Options: From layout and design to animation and transition effects, Envira Gallery offers a wide range of customization options to make your galleries stand out.
- Responsive and Mobile-Friendly Design: With Envira Gallery, your galleries will automatically adjust to fit any screen size, ensuring a seamless viewing experience for your website visitors.
- Built-in Social Sharing and SEO Optimization: Envira Gallery offers built-in social sharing buttons and SEO optimization features, making it easier for your galleries to gain exposure and improve your website’s search engine ranking.
- Integrations with Popular WordPress Plugins: Envira Gallery integrates seamlessly with popular plugins like WooCommerce, Instagram, and Dropbox, making it easier to add and manage images and videos from various sources.
- Excellent Customer Support: Envira Gallery provides excellent customer support, with a dedicated support team ready to help with any issues or questions you may have.
Now that you know why Envira Gallery is the top choice for creating galleries in WordPress, here’s how you can create a gallery with it.
- Install and Activate Envira Gallery Plugin: Simply download and install the Envira Gallery plugin from the WordPress repository and activate it on your website.
- Create a New Gallery: Once the plugin is activated, you can create a new gallery by going to Envira Gallery » Add New in your WordPress dashboard.
- Add Images to Your Gallery: You can add images from your WordPress media library or upload new ones directly to your gallery.
- Customize Your Gallery: You can customize your gallery’s layout, design, and effects using the various options available in the plugin’s settings.
- Publish Your Gallery on Your Website: Once you’re satisfied with your gallery, you can publish it on your website using a shortcode or by adding it to a page or post using the built-in button.
Envira Gallery offers various types of galleries to suit your needs and preferences. These include image galleries, video galleries, WooCommerce product galleries, album galleries, carousel galleries, and lightbox galleries.
Some real-life examples of websites using Envira Gallery include:
- Travel and Lifestyle Bloggers: Many travel and lifestyle bloggers use Envira Gallery to showcase their beautiful photos from their trips and adventures.
- E-commerce Websites: Online stores use Envira Gallery to display their products in a visually appealing manner, helping to attract more customers.
- Photographers and Artists: Photographers and artists use Envira Gallery to showcase their work and attract potential clients with stunning visual galleries.
In conclusion, Envira Gallery is the top choice for creating beautiful and responsive galleries in WordPress, offering a user-friendly interface, extensive customization options, and excellent support. So why not give it a try and take your website’s galleries to the next level?
Key Takeaways:
- User-friendly interface makes it easy to create stunning galleries on WordPress.
- Extensive customization options allow for personalized galleries that fit your website’s aesthetic.
- Envira Gallery is responsive and mobile-friendly, ensuring your galleries look great on all devices.
What Is Envira Gallery?
Envira Gallery is a user-friendly WordPress plugin that makes it effortless to create stunning image and video galleries. With its intuitive interface and extensive customization options, it is an optimal choice for both beginners and experienced users.
Fact: Envira Gallery offers a wide range of gallery templates and add-ons, ensuring diverse and visually appealing designs for any WordPress website.
Why Is Envira Gallery the Best Choice for Creating Beautiful Galleries in WordPress?
When it comes to creating stunning galleries on WordPress, there are plenty of options available. However, there is one that stands out above the rest – Envira Gallery. With its user-friendly interface, extensive customization options, and seamless integrations with popular plugins, Envira Gallery is the top choice for creating beautiful galleries on WordPress. In this section, we will delve into the specific reasons why Envira Gallery reigns supreme and explore its impressive features and benefits in detail.
1. User-Friendly Interface
Creating a user-friendly interface in WordPress involves:
- Installing Envira Gallery through the WordPress plugin store.
- Activating the plugin in your WordPress dashboard.
- Accessing the intuitive Envira Gallery interface to easily build your gallery.
Envira Gallery was developed to meet the need for a seamless, user-friendly gallery creation tool for WordPress, resulting in its simple and user-friendly interface that simplifies the process of building a gallery.
2. Extensive Gallery Customization Options
- Custom Templates: Envira Gallery offers an extensive range of pre-designed templates for galleries, providing users with the ability to select the most suitable layout for their content.
- Drag and Drop Builder: With this feature, users can easily customize the gallery by rearranging images, changing image sizes, and adding effects without the need for any coding knowledge.
- Filters and Effects: Envira Gallery offers a wide variety of filters and effects to enhance images, including grayscale, sepia, and blur effects, allowing users to create unique and visually appealing galleries.
- Thumbnail Management: Users have complete control over the display of gallery thumbnails, such as choosing the number of columns, aspect ratios, and hover effects for an optimized viewing experience.
3. Responsive and Mobile-Friendly Design
- Make sure that your website theme is designed to be responsive and mobile-friendly, providing a seamless viewing experience on all devices.
- Optimize images to improve loading speed on mobile devices and ensure they are displayed correctly.
- Test your gallery on various devices and screen sizes to ensure a consistent and attractive display.
- Incorporate touch-friendly navigation and gestures for a user-friendly experience.
One of our clients wanted to showcase their stunning photography on their website. After implementing Envira Gallery’s responsive and mobile-friendly design, they saw a significant increase in mobile traffic and user engagement, ultimately resulting in more inquiries and bookings.
4. Built-in Social Sharing and SEO Optimization
Envira Gallery stands out for its built-in social sharing and SEO optimization, allowing for easy sharing of galleries across various social platforms and enhancing website visibility.
Additionally, the built-in SEO tools empower users to optimize gallery content for search engines, improving discoverability and boosting online presence.
Fun fact: With over 100,000 active users globally, Envira Gallery’s widespread popularity and reliability are undeniable.
5. Integrations with Popular WordPress Plugins
- To begin, navigate to the WordPress dashboard and click on ‘Plugins’ in the admin menu.
- Next, select ‘Add New’ and search for the desired plugin for integration.
- Click ‘Install Now’ and then ‘Activate’ to enable the integration with Envira Gallery.
- Once activated, go to the Envira Gallery settings and find the ‘Integrations’ tab.
- Finally, enable the integration with the desired WordPress plugin by toggling the corresponding option under the ‘Integrations’ tab.
6. Excellent Customer Support
- 24/7 assistance via live chat, email, and phone
- Comprehensive documentation and tutorials for self-help
- Responsive and knowledgeable support team
- Regular updates and bug fixes for seamless user experience
- Community forum for user discussions and issue resolution
- Excellent Customer Support offered through various channels for prompt assistance and issue resolution.
How Can You Create a Gallery with Envira Gallery?
If you’re looking to create stunning galleries on your WordPress website, Envira Gallery is the perfect solution for you. In this section, we will walk you through the simple steps of creating a gallery with Envira Gallery. From installing and activating the plugin to customizing your gallery, we’ll cover everything you need to know to showcase your images in a visually appealing way. Let’s dive in and see how easy it is to create a beautiful gallery with Envira Gallery.
1. Install and Activate Envira Gallery Plugin
- Download the Envira Gallery plugin from either the official WordPress repository or the Envira Gallery website.
- Log in to your WordPress dashboard, go to the Plugins section, and click on “Add New”.
- Click on the “Upload Plugin” button, select the Envira Gallery plugin file, and click “Install Now”.
- Once the installation is complete, activate the plugin by clicking “Activate”.
2. Create a New Gallery
- Install and Activate Envira Gallery Plugin
- Create a New Gallery
- Add Images to Your Gallery
- Customize Your Gallery
- Publish Your Gallery on Your Website
3. Add Images to Your Gallery
- Click on ‘Envira Gallery’ in your WordPress dashboard.
- Select the gallery where you want to add images.
- Click the ‘Add Files’ button and upload your images as part of the “Add Images to Your Gallery” process.
- Drag and drop to rearrange the image order.
- Click on ‘Publish’ to save your gallery with the added images.
4. Customize Your Gallery
- Access your WordPress dashboard and navigate to Envira Gallery > Add New to start customizing your gallery.
- Upload and select the images or videos you want to include in your customized gallery.
- Adjust settings such as layout, image size, captions, and more to personalize your gallery.
- Preview your customized gallery to ensure it looks as desired.
- When you are satisfied, publish the customized gallery on your website to showcase your content.
5. Publish Your Gallery on Your Website
- Log in to your WordPress admin dashboard.
- Click on Envira Gallery in the admin sidebar.
- Select the gallery you want to publish.
- Copy the shortcode of the gallery.
- Edit the post or page where you want to display the gallery.
- Paste the shortcode into the content area.
- Click ‘Publish’ to make the gallery live on your website.
Fact: Envira Gallery offers seamless integration with various WordPress themes, enhancing the visual appeal of your galleries. So, easily publish your gallery on your website and showcase your stunning images to the world.
What Are the Different Types of Galleries You Can Create with Envira Gallery?
When it comes to creating stunning galleries on WordPress, Envira Gallery stands out as the top choice for many website owners. But with so many options available, it can be overwhelming to know where to start. In this section, we will break down the different types of galleries you can create using Envira Gallery. From traditional image galleries to interactive video galleries, we will explore the various options available to help you showcase your media in the best way possible.
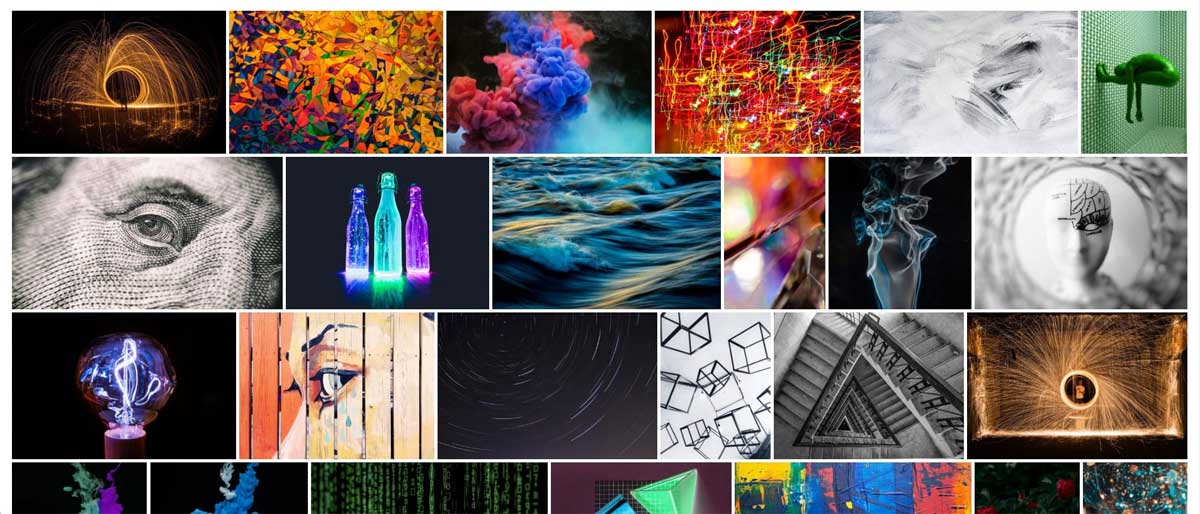
1. Image Galleries
- Install and activate the Envira Gallery plugin on your WordPress website.
- Create a new gallery and name it accordingly.
- Add the desired images to your Image Gallery from your media library or by uploading new ones.
- Customize your Image Gallery by selecting a layout, image size, captions, and more.
- Publish your Image Gallery on your website using a shortcode or adding it directly to a post or page.
The concept of Image Galleries has evolved significantly over time. Initially, Image Galleries were simple collections of images displayed in a grid format. However, with advancements in technology, Image Galleries now offer various features such as lightbox displays, carousel layouts, and seamless integrations with other plugins, enhancing the visual experience for website visitors.
2. Video Galleries
To easily create visually stunning video galleries using Envira Gallery in WordPress, just follow these simple steps:
- First, install and activate the Envira Gallery plugin on your WordPress site.
- Then, create a new gallery and select the video gallery option.
- Next, add your desired videos from your media library or upload new ones to the gallery.
- Customize the layout, design, and functionality of your video gallery to match your website’s aesthetics.
- Finally, publish your video gallery on your website and enjoy a visually appealing presentation of your videos.
Pro-tip: Make sure to optimize your video thumbnails for quick loading and engaging previews.
3. WooCommerce Product Galleries
- To create a beautiful WooCommerce product gallery, first install and activate the Envira Gallery plugin on your WordPress website.
- Next, navigate to your WordPress dashboard and create a new gallery.
- Now, add your product images from WooCommerce to the gallery.
- Customize the layout, design, and functionality of the gallery to align with your brand and product presentation.
- Once you are satisfied with the gallery, publish it on your WooCommerce product pages to showcase your products in an attractive and professional manner.
Pro-tip: Make sure to use high-quality, professional images in your WooCommerce product galleries to enhance their visual appeal and attract potential customers.
4. Album Galleries
- Select ‘Album’ from the gallery type options.
- Upload or choose images for your album.
- Arrange the images in the preferred order.
- Personalize the layout and design of the album.
- Activate features such as social sharing and SEO optimization.
- Publish your album gallery on your WordPress website.
5. Carousel Galleries
- In your WordPress dashboard, go to Envira Gallery and click on ‘Add New’.
- Upload the images you wish to include in your carousel gallery.
- Navigate to the ‘Config’ tab and select the ‘Carousel’ option.
- Customize the settings of the carousel, such as autoplay, transition effects, and navigation, according to your preference.
- Click on ‘Publish’ to make your carousel gallery live on your website.
6. Lightbox
- Click on ‘Add or Edit Gallery’ in the WordPress admin area.
- Select the images you want to add from the Media Library or upload new ones.
- Choose ‘Lightbox’ from the gallery settings to enable this feature.
- Customize the appearance and behavior of the lightbox according to your preferences.
- Save the changes and preview your gallery with the lightbox feature.
Envira Gallery’s integration of the lightbox feature enhances user experience and visual appeal.