How to setup an IMAP email account on your iPhone
Table of Contents
This tutorial will show you how to setup an IMAP email account on your iPhone.
1) First, locate and press the “Settings” icon. It may be on a different screen or in a different location than shown here.
 First, locate and press the \"Settings\" icon. It may be on a different screen or in a different location than shown here.")
2) Then select “Mail, Contacts, Calendars”.
 Then select \"Mail, Contacts, Calendars\".")
3) Select “Add Account”.
 Select \"Add Account\".")
4) Then choose “Other”.
 Then choose \"Other\".")
5) Press “Add Mail Account”.
 Press \"Add Mail Account\".")
6) Enter the Name, Email address, and Email password of the email account you’re adding.
 Enter the Name, Email address, and Email password of the email account you're adding.")
7) A “Description” will automatically appear, but you can change it if you like. When finished, press “Next”.
 A \"Description\" will automatically appear, but you can change it if you like. When finished, press \"Next\"")
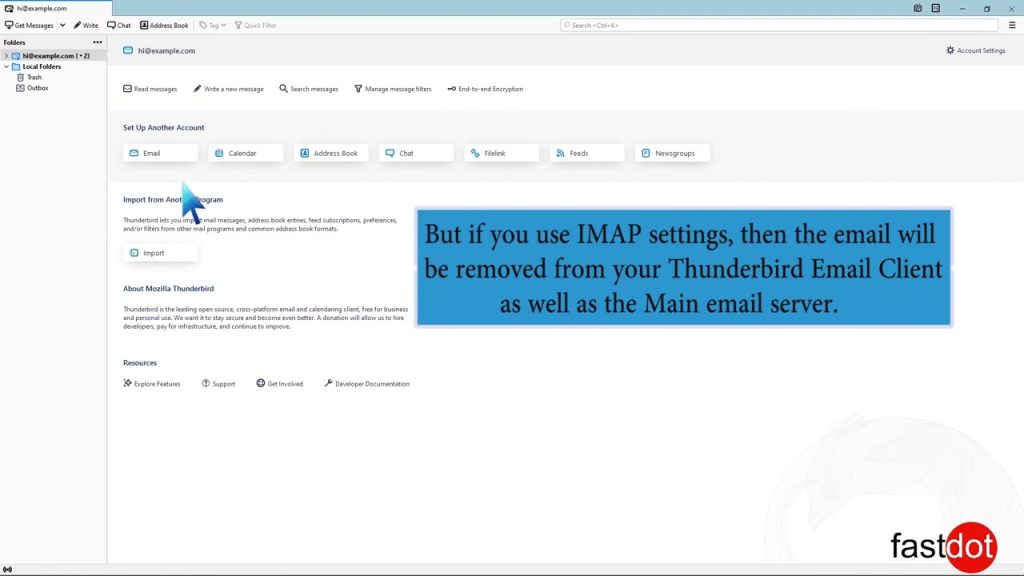
8) In this tutorial we are creating an IMAP account… therefore, ensure the IMAP option is selected here.
 In this tutorial we are creating an IMAP account... therefore, ensure the IMAP option is selected here.")
9) Next you have to enter your Incoming Mail Server settings. Enter the Host Name, User Name and Password for the Incoming Mail Server.
 Next you have to enter your Incoming Mail Server settings. Enter the Host Name, User Name and Password for the Incoming Mail Server.")
10) Next, enter the Host Name, User Name and Password for the “Outgoing” Mail Server.
 Next, enter the Host Name, User Name and Password for the \"Outgoing\" Mail Server.")
11) When finished, press “Next”.
 When finished, press \"Next\".")
12) Then press “Save”.
 Then press \"Save\".")
Success! The IMAP email account has been setup on the iPhone, and you can see it here listed under “Accounts”.

13) Let’s return to the home screen by pressing the Home button on the iPhone.
14) To check your email, press the “Mail” icon here (Note: the icon may be in a different location on your iPhone).
 To check your email, press the \"Mail\" icon here (Note: the icon may be in a different location on your iPhone).")
15) If you have multiple email accounts setup in your iPhone, they’ll all be listed here. Select the email account we just setup…
 If you have multiple email accounts setup in your iPhone, they'll all be listed here. Select the email account we just setup...")
16) … and any emails in your inbox will be displayed here. Click an email header to see the email.
 ... and any emails in your inbox will be displayed here. Click an email header to see the email.")
Setting up an IMAP (Internet Message Access Protocol) email account on your iPhone allows you to keep your emails synchronized across all devices. When you read, delete, or move an email on one device, the change is reflected on all devices. This is especially beneficial for users who access their email on multiple devices. Here’s how to set up an IMAP email account on your iPhone:
Step 1: Access Settings
- Open the Settings App: Unlock your iPhone and find the “Settings” app, symbolized by a gear icon on your home screen.
- Scroll to Mail: Once inside Settings, scroll down until you find the “Mail” option and tap on it.
- Accounts: In the Mail settings, tap on “Accounts” to view a list of currently configured email accounts.
- Add Account: Tap “Add Account” to begin the process of adding a new email account.
Step 2: Choose Your Email Provider
- Select Your Provider: You’ll see a list of common email providers like iCloud, Exchange, Google, Yahoo, and Outlook.com. If your email provider is listed, select it. If not, tap “Other” to manually set up your account.
Step 3: Enter Your Account Information
- Choose IMAP: If prompted, select the option to set up the account using IMAP.
- Input Your Details: You will need to enter your name, email address, password, and a description for the account. The description will help you identify the account if you have multiple email accounts on your iPhone.
- Name: The name that will appear on emails you send.
- Email: Your full email address.
- Password: The password for your email account.
- Description: A helpful description of this email account (e.g., “Work Email”).
Step 4: Incoming and Outgoing Mail Server Configuration
- Incoming Mail Server Settings:
- Host Name: Enter the IMAP server address provided by your email service (e.g.,
imap.yourdomain.com). - Username: Usually, this is your full email address.
- Password: The password for your email account (should already be filled in).
- Host Name: Enter the IMAP server address provided by your email service (e.g.,
- Outgoing Mail Server (SMTP) Settings:
- Host Name: Enter the SMTP server address provided by your email service (e.g.,
smtp.yourdomain.com). - Username: Typically, your full email address.
- Password: The password for your email account.
- Host Name: Enter the SMTP server address provided by your email service (e.g.,
- After entering these details, tap “Next.” Your iPhone will verify the email settings and attempt to connect to your email server.
Step 5: Select Data to Sync
- Choose What to Sync: You can choose to sync Mail, Contacts, Calendars, and Notes with your IMAP account. By default, only Mail is selected. Adjust these settings according to your preferences.
- Save: Tap “Save” to finish the setup process.
Step 6: Check Your Email
- Open the Mail App: After setting up your account, open the “Mail” app on your iPhone. You should now see your IMAP account listed, and you can access your emails from there.
Troubleshooting Tips
- If your iPhone cannot verify your email settings, double-check the server addresses, usernames, and passwords for any typos.
- Ensure you have an active internet connection.
- Some email providers may require you to enable IMAP access via their web interface or to generate an app-specific password, especially if you have two-factor authentication enabled.
Setting up an IMAP email account on your iPhone ensures that you stay connected to your email wherever you go, with all your devices kept in sync.